Details: Upper Muley Twist Canyon 
Distance: 9.5 - 14.5 miles (loop)
Waterpocket Fold District, Capitol Reef National Park, near Capitol Reef in South Central Utah
Hike Facts
- Distance: 9.5 - 14.5 miles (loop)
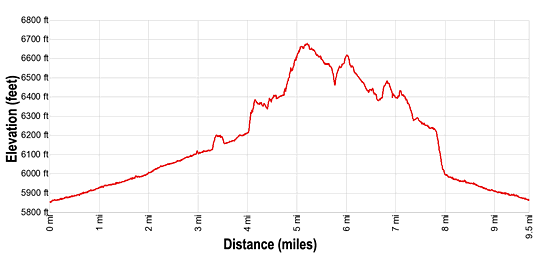
- Elevation: 5,850-ft. - 6,670-ft.
- Elevation Gain: 820-ft.
- Difficulty: moderate-strenuous
- Trail Highlights: See Trail Intro
- Basecamp(s): Capitol Reef
- Region: South Central Utah
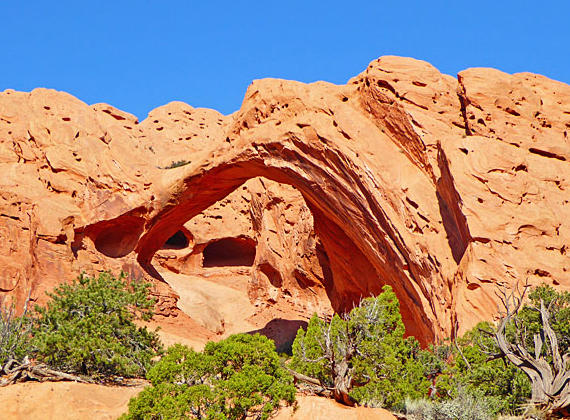
This amazing hike in Capitol Reef travels through a scenic canyon with eight arches and impressive rock formation and then climbs to and traverses the ridge atop Waterpocket Fold with panoramic views of the colorful ridge and surrounding area.
Upper Muley Twist Loop

Note: This trail description assumes you are starting the hike at the 4WD trailhead. If starting from the 2WD trailhead add 2.5 miles (one-way) or 5.0 miles (round-trip) to the mileage indicated below.
From the Upper Muley Twist/Strike Valley Overlook parking area, walk past the trail branching right (east) to the Strike Valley Overlook and then follow the wash as it heads northeast. A short distance beyond the parking area a trail bears right onto a bench. You can either stay in the wash or follow the trail across the bench. (I generally find walking on the benches easier than walking in the wash.) At 0.1 miles the bench trail rejoins the wash.
Reach an unmarked “Y” intersection in the canyon at 1.2 miles. Take the right branch to stay in Upper Muley Twist Canyon. An arch is seen on the left canyon wall, about 200-ft. above the wash, at 1.5 miles. Soon after sighting the arch you will pass an opening along the west canyon wall.
At 1.7 miles a large crack appears along the west canyon wall. Photogenic Saddle Arch is located above the crack. A short distance beyond reach a junction and the beginning of the loop portion of the hike. An old wood sign on the trail points right (east) to the Rim Route. My advice is to bear left and walk the trail in the clockwise direction, traveling up the canyon before ascending to the rim. The elevation is more gradual this way.
The trail now continues up the wash. In places the wash is covered with slickrock and in other spots scattered with rocks. Along the way you will need to climb up low pour-offs.
At 2.3 miles a small arch appears high along the canyon wall. Beyond the sighting of the arch the route travels through a narrows and then passes a fissure along the western wall at 2.5 miles. A tenth of a mile past the fissure look high along the west wall to see the fourth arch along the route.
At 2.9 miles there is another break in the west canyon wall. Look high along the wall above the break to see the fifth arch. This arch is very difficult to see. The sixth, very small arch is located a short distance, again high along the western wall along the base of a small fin.
At 3.1 miles, above a gash in the west wall is another arch at the base of a small fin. A tenth of a mile beyond (3.2 miles) the canyon begins to constrict. You now have a choice of staying in the canyon or take a bypass route. I recommend staying in the wash unless you run into water along the canyon bottom.
If water is present, look for rock cairns marking a bypass route along the right side of the canyon. The bypass climbs a slickrock slope and then follows a route, marked with cairns, along a bench above the canyon bottom before dropping back into the wash at 3.5 miles. The bypass offers great views of interesting and colorful formations along the canyon’s west wall.
As you continue up canyon you now enjoy fine views of the white Navajo sandstone cliffs along the canyon’s east wall. At 3.6 miles the trail curves to the left (west) and travels through a rocky section of the wash. Ahead views open to an arch located along the base of a slot canyon on the west wall. A short detour leads to this interesting arch.
At 3.9 miles reach a narrows that soon ends in an impassable pour-off. Cairns mark the bypass route that climbs about 150-ft. up the right side of the canyon, travels along a slickrock bench above the narrows and then descends back into the canyon at 4.5 miles. As you climb to the bench turn around for fine views down the length of Upper Muley Twist Canyon. Once on the bench you are treated to interesting vistas of the canyon’s sculpted rock wall to the west.
Back in the canyon the trail ascends the sandy wash. At 4.7 miles reach and old wood sign marking the beginning of the route to the rim. The route now ascends switchbacks through layers of Wingate and then Navajo sandstone to the ridge atop Waterpocket Fold. Pay close attention to the cairns to stay on track. At the top of the ridge there is a sign directing hikers walking in a counter-clockwise direction on where to start their descent to the canyon bottom.
As you crest the ridge panoramic views unfold of the Strike Valley, Tarantula Mesa, Swap Mesa and the Henry Mountains to the east and the fascinating Wingate formations along the canyon’s western wall. The route now heads southeast along the top of the Fold with ever evolving views of the multihued ridge and surrounding landscape.
At 5.5 miles cross a short, steep notch along the crest of the ridge. At 6.5 miles the trail traverses a saddle on the ridge and then climbs up and over slickrock ledges as it returns back to the ridge top. As you walk keep an eye out for the arches previously spotted along the canyon’s west wall.
At 7.5 miles the route curves to the right (southwest) and soon reaches a sign pointing to the route dropping into the canyon. A steep descent, losing over 250-ft. in 0.3 miles, leads to the wash and the junction marking the south end of the loop. Turn left and retrace your steps down canyon to the trailhead and your vehicle. Total distance for the loop hike is 9.5 miles.
Travel along this route is only recommended during the cool temperature of the spring and fall. Be sure to carry plenty of water, there are no dependable water sources along the route. The route is generally well cairned but be sure to pay careful attention on bypass routes, slickrock expanses and where the route ascends to and descends from the rim.
Don’t enter the canyon if a storm is threatening. Check with the Capitol Reef Visitor Center on current road conditions before setting out on this hike. Roads can become slick and impassable when wet.
Elevation Profile
Driving Directions
Capitol Reef Visitor Center: Turn left out of the Visitor Center on Campground Road and after 100-ft. turn right onto UT 24 East. Drive 9.0 miles and turn right onto the Notom-Bullfrog Road. (The road, signed for Notom and Lake Powell, is initially paved but turns to a good gravel/dirt road after 5.0 miles.) Follow the Notom Road for 32.5 miles and then turn right (southwest/west) onto the Burr Trail Road. Drive 3.2 miles on the Burr Road, which climbs switchbacks, passes the trailhead for Lower Muley Twist and then heads northwest. Turn right onto the road signed for Strike Valley Overlook / Upper Muley Twist. Reach the 2WD parking area after 0.4 miles. Hikers with a 4WD should continue another 2.5 miles to the 4WD trailhead. Under good conditions a high clearance vehicle should also be able to reach the trailhead. Check at the Capitol Reef Visitor Center for current road conditions before driving into the canyon with a high clearance two-wheel drive vehicle.
From Bullfrog: Head northeast on UT 276 W/Ferry Road for 4.4 miles and then turn left onto BLM 12000/Notom Road. After driving 30.3 miles turn left (west) onto the Burr Trail Road. Drive 3.2 miles on the Burr Road, which climbs switchbacks, passes the trailhead for Lower Muley Twist and then heads northwest. Turn right onto the road signed for Strike Valley Overlook / Upper Muley Twist. Reach the 2WD parking area after 0.4 miles. Hikers with a 4WD should continue another 2.5 miles to the 4WD trailhead. Under good conditions a high clearance vehicle should also be able to reach the trailhead. Check at the Capitol Reef Visitor Center for current road conditions before driving into the canyon with high clearance two-wheel drive vehicle.
Trail Resources
Trail Intro / Trail Photo Gallery / Trail Map
Basecamp(s) Information:
Capitol Reef
Region Information:
South Central Utah
Other Hiking Regions in:
Utah